Primo Ramdisk natively supports FAT/FAT32/exFAT/NTFS file systems. This means that a virtual disk can be automatically formatted with a specified file system. Besides, Primo Ramdisk allows customizing the file system settings such as cluster size, volume labels, folders etc. It does not need the help of an associated image file which is required by most competitors. This is useful when you do not want to use the image file but still hope to keep the initial format across computer restarts. Of course, if you associate an image file to the virtual disk, you can format the disk with any Windows supported file system. And the file system structure of the disk follows the image file contents. See Image File.
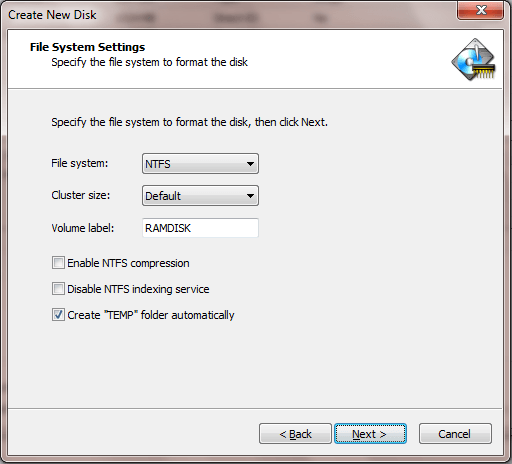
Basic File System Settings
In this page, choose the file system you want. Then you may specify the cluster size, volume label and other settings if necessary. Please tick the checkbox Create "TEMP" folder automatically if later you will set up Windows TEMP/TMP environment variable to this ram disk.

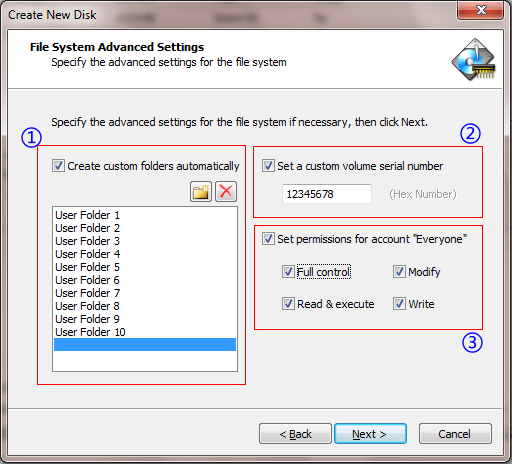
Advanced File System Settings
In this page, you can set up the advanced file system settings if necessary.

(1) Custom Folders
You can input up to 10 custom folders which will be automatically created on a virtual disk.
To set up the custom folders, first you need to tick the checkbox Create custom folders automatically. Then double click the blank area of the input box below the checkbox to enter the folder name. To remove a custom folder from the list, first select that folder item and then click the ![]() button.
button.
(2) Custom Volume Serial Number
By default, Primo Ramdisk will automatically generate a volume serial number for the virtual disk. In case that you want to assign a custom serial number, you can tick the checkbox Set a custom volume serial number, and then enter 8 hexadecimal digits as the serial number.
(3) NTFS Permissions for Account "Everyone"
When NTFS file system is specified to format a virtual disk, by default, permissions for user account "Everyone" are not defined because of security reasons. This will be a problem when you what to share a ram disk to network users and allow anonymous users to access the disk. In such scenario, you can tick the checkbox Set permissions for account "Everyone", and then control the access permissions of user account "Everyone" which also includes the anonymous user.